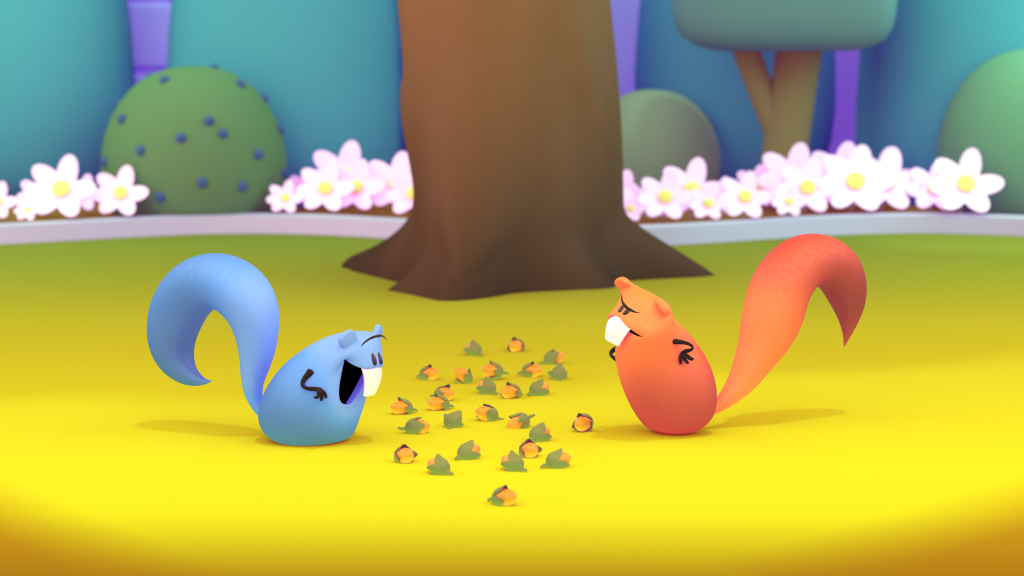
Cartoony shot by Torben Soettrup
The Animation Process
Animation Mentor: Where did the idea for this shot come from? Torben Soettrup: I’ve been working with my friend, Animation Director Esben Toft Jacobsen, on a bunch of shorts about animals doing silly things. This is one of them!I have always loved to draw animals and study their behaviour. Every animal has found unique ways to adapt and survive and caricaturing this in animation/cartoons is like an infinite source of inspiration. An awesome example of this is the Rollin’ Wild shorts with the bloated animals. AM: How long did it take to animate, from idea to final render? Can you tell us about the creation process? TS: I worked on the shot as if it was actually two shots. The first one was the squirrels on the ground up until the orange squirrel attacked the blue squirrel. The second one was the squirrels fighting inside the tornado. Part one was 95% done within the 6-week Cartoony Animation for 3D Animators course, while attending my full time job. The second part with the tornado took several months to do. The animation was fairly easy and fast to do. But it was the research and development of how to do a tornado, or some kind of fight cloud, that really took a loooooong time. Once I finally figured out the approach, the actual animation was probably about a week or two in total. The work process was pretty linear, with the exception of a reeeeallly long research phase in the middle. So it went something like this:
- 2D animatic
- 3D layout
- Modifying the squirrel rig
- 2D blocking
- 3D blocking
- 3D animation
- Fight cloud research, fight cloud research, fight cloud research….
- Very close to giving up on the fight cloud
- Tornado research, tornado research, tornado research….
- Tornado rig/animation
- Lighting and rendering
- Drawing smear frames in compositing
- Done!
2d Blocking pass
My passion for making 3D characters do crazy takes and smears has led me down many different paths. I have tried to do rigs that would be able to do all sorts of weird stuff, but I always ended up with a cluttered rig and limits on the takes/smears you could do with it. Also the takes needed to be planned during the rigging phase, leaving no room for improvising in animation. Later on I started doing rig tools that could be added on-the-fly. For example, adding a control to an arbitrary place on the character in the animation scene. And also making setups to make collision bulge effects on the character. This was much more promising, but still required the animator to be somewhat tech-minded.
3D blocking pass
Recently I have started playing with much more simple approaches, like duplicating meshes on the fly and drawing on top of the camera frame in Maya. This is much faster and very intuitive. The drawings can get a bit disconnected from the rendered image since it is just a flat drawing slapped on top of the render, so while making this squirrel shot I developed a way to use smear tools in compositing to have the drawings blend in better with the final image. Developing and pushing techniques like this is super interesting to me. I think it adds so much and it opens up a big bag of tricks that was sort of abandoned when everyone started doing 3D animation. In recent years we have seen many awesome examples of this though. Films like Spider-Man: Into the Spider-Verse and Hotel Transylvania are amazing in this regard!
Animation Workflows
Animation Mentor: How did the animation process for this shot differ from other workflows you’ve tried? TS: My mentor, Mark Oftedal, offered so many great insights and techniques! So my process for the shot differed in several ways. When planning the animation, Mark taught us how to thoroughly analyze reference clips in a way I had not tried before. It involved really breaking down the reference in keys and breakdowns, looking at the timing, the shapes and silhouettes, and drawing all the important frames one by one. Not tracing them, but copying them to really understand everything that made it work.Tex Avery reference exercise
Mark also asked us to put all the keys and breakdowns in the blocking, so the blocking held all the answers. This was also new to me. I usually go to spline/polish much earlier, but this was a great way and I will definitely include it in my workflow. Also I found some new ways to work with multiples, smear frames, and drawings on top of the animation. And it was brilliant to see it all come together in the final shot!Animation Challenges and Surprises
AM: Did you run into any specific challenges when translating your 2D animation planning into 3D animation/posing? Were there any elements you had to adjust once they were in 3D? TS: There were some changes in timing and poses. The biggest change from 2D to 3D was a great idea from Mark to change which squirrel was attacking. In the 2D animatic I had the “intruder” attack, but storywise it is much more interesting to reverse it. AM: What was the hardest piece to animate? How did you get through it? TS: I would say it wasn’t a specific part of the shot, more a specific part of the character: I spent a lot of time polishing the tail. It’s a 7 joint FK chain and it was really hard to keep a nice arc on the tip of the tail. I tried out several approaches. In the end it was a combination of techniques, but the most helpful trick was to bake parts of the tail animation to locators in world space. I highly recommend checking out Richard Lico’s tutorials if this sounds unfamiliar.Cartoony Animation
AM: Why do you think cartoony style animation is important for animators to learn? TS: I think it is a great way to loosen up and really play with how far you can push animation. It’s a great way to develop a good sense of timing and spacing as well. For me, it is just so much fun to do! It’s awesome to do big smears or breaking joints in fast moves and then when you play it back it just reads and feels natural.I think cartoony animation is a great way to loosen up and really play with how far you can push animation. It’s a great way to develop a good sense of timing and spacing as well.AM: Have you seen a piece of animation recently that was inspiring? What was it and why did it inspire you? TS: YES! Right now I am totally geeking out watching the opening shot in The Gruffalo. It is a squirrel running in a forest (yes, I have a thing with squirrels 🙂 Whoever animated this shot did an incredible job! This squirrel moves in the most squirrely way. So nicely captured while still very cartoony. It is the essence of how squirrels move. The shot is very long (about 40 seconds) so these days I spend a lot of evenings breaking it down to learn why it works so well. AM: What is one piece of advice you’d give to other animation students? TS: My advice is deceptively simple: EVERYTHING IS A BOUNCING BALL!! Some years ago I was fortunate to work with Sten Platz, a great animator. He made animation look so easy—delivering one great shot after the other! Often I would ask him “HOW do you animate?” because he clearly knew something that I didn’t, and every time he would answer, “Everything is a bouncing ball”. And for a long time I thought, “Yes, I know the bouncing ball. It’s that simple animation exercise you get during the first week of animation school. That’s how a ball moves—but how about a character?” Years later I was talking to another animator about the spacing on eye blinks. And he said, “It’s just a bouncing ball”. Right then and there I finally got it. EVERYTHING is a bouncing ball—not just the hips or a foot or a prop being thrown. Literally every little part of the character can be thought of as a bouncing ball. I keep coming back to this simple concept every time I struggle with arcs, weight, timing and spacing. No matter if it’s an entire character or some little detail, the bouncing ball most likely holds the solution to any physics-related problem there may be.
Think of the character as a lot of bouncing balls. This way of thinking has helped me in every shot since that day!The spacing of the bouncing ball even applies to much more than just physics. The inertia of a muscle follows the same pattern, hence the eye blink example. The hips, spine, upper body, neck and head are like a stack of offset bouncing balls. Sometimes you need to rotate something 90 degrees so you have a sideways bouncing ball, but still the pattern is there. In fast moves you can get away with some crazy inbetweens as long as you stick to this basic principle. It’s the secret that keeps on giving! So that is my best advice. Think of the character as a lot of bouncing balls. This way of thinking has helped me in every shot since that day!
Want more? Here’s a making of video of Torben’s shot.