NOTE: Video is produced and property of Skwigly Magazine
For the animated feature Rio 2, the sequel to his award-winning 2011 blockbuster, director Carlos Saldanha flew his colorful, musical stars from the vibrant city of Rio de Janeiro into the lush Amazon jungle. The Twentieth Century Fox film created at Blue Sky Studios soared at the box office opening weekend and is on track to rival its progenitor. At Blue Sky, lighting supervisor Jeeyun Sung Chisholm led a team of 40 artists who worked on the film. Prior to Rio 2, Chisholm was a lighting lead on the animated features Epic, Horton Hears a Who!, Ice Age: The Meltdown, and lighting technical director on Robots, working with Blue Sky Studios’ proprietary lighting and rendering system CGI Studio.
During the past few years, visual effects and animation studios have flocked to ray tracing software like VRay, Mental Ray, and Arnold that produce physically accurate lighting and rendering, and to RenderMan’s physically plausible shading in which lights, shaders, ray tracing algorithms, and the physical properties of materials work together to produce realistic results. Long before any of these programs came to market, though, Blue Sky artists were lighting and rendering scenes with CGI Studio, a proprietary physics-based rendering software system developed soon after the the studio was founded in 1987.
At a time when many people believed ray tracing software was too slow for a film projects, Blue Sky turned CGI Studio loose on the short animated film “Bunny,” which received an Oscar in 1998, and artists at Blue Sky have used the software on each film since. CGI Studio has evolved since 1998, of course. Chisholm calls the current version “CGI Studio Plus Plus.” But, one thing hasn’t changed: The software is still script-based. Chisholm likes it that way. She calls it “intuitive.”
You don’t need a GUI to work quickly.
“A lot of lighting TDs think it would be uncomfortable to type to see something visual,” Chisholm says. “A long time ago, I was exactly that person. But once you get used to it, it’s almost irreplaceable. It’s very intuitive. Very basic. Very precise. If you are looking at a light through Maya and navigating through a GUI and want to move it a little to the right, you guesstimate. But, if you know basic scripting, and want to move the light 10 degrees, you can type the number in. It’s faster and you get exactly what you expect.”

Change the lighting design when the set changes.
“We do lighting design per sequence – per set – whenever the location changes,” she says. “We look at a beauty frame that represents a shot. A still image, not the moving images. And, a lot of times that works for the rest of the shot. When we’re working we have a Quick Renderer that’s paired with the scene file we type into. Let’s say you’re changing the color of the light. You type a number. Hit a button. And see the result. It’s almost realtime. Once we render the final images, we see the lighting working in all the frames. For our daily renders, we render on two’s for fast iterations.”
Five lights per character is usually enough.
“For character lighting what we do is similar to a live action shoot,” Chisholm says. “Because our renderer is physically correct, the number of lights we need is very small. We typically use five lights per character, front light to illuminate the face, bounce light from the sky and ground, rim light, fill light – classic five light lighting similar to live action beauty lighting,” Chisholm says. “Then, we might tweak a little bit for the props. For the sets, we do as much realistic lighting as we can.”
To understand beauty lighting, watch old films.
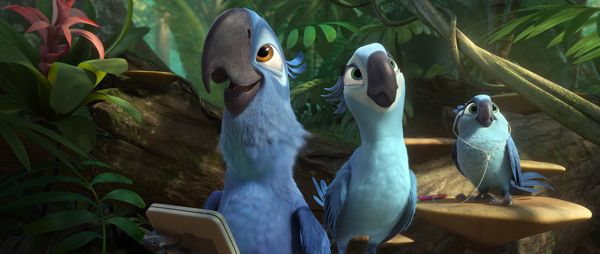
“I don’t know what it is with the new movies and digital cinema, but they don’t have as much classic female beauty lighting,” Chisholm says. “We looked a lot at Casablanca, which our art director Tom Cardone recommended. Everyone had seen it, but we watched it again together. He pointed out how they crafted it shot by shot. How shadows go across the clothing. How the face is blooming. We also looked at a lot of still photography – Rita Hayworth, Katherine Hepburn. We looked at Katherine Hepburn a lot.”
When you have a complex environment, manage the shadows.
“We had a lot of shots with characters in the middle of a jungle canopy,” Chisholm says. “The art director was very specific about not wanting to obscure the characters’ faces. So, we maintained shadows on the body and softly erased any shadows around the faces to give the audience a focus point. We used a gobo to shape the shadows here and there, and pushed and pulled the colors around the character to guide the audience to a character’s face.”
Control the background lighting to pop colorful characters from colorful backgrounds.
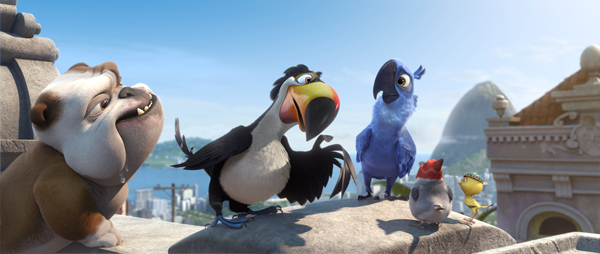
“Our general guideline was to make the film bright and happy, and Carlos wanted to show the lush colors of the Amazon jungle,” Chisholm says, referring to director Saldanha. “But, the complex jungle would compete with the characters’ colors and take the audience’s attention away. We wanted to make the main talking character distinguishable from the rest of the scene, but we had too many things with bright colors. Red, yellow, blue, white. Because usually shading was already done, we had to balance the colors in lighting. We learned how to make the character pop from the set, by how much we brought up the colors in the background. Balancing the light was really a challenge.
Lighting feathers is tweaky.
“If you hold up a feather, you kind of see through it,” Chisholm says. “If you put light immediately behind a feather, it comes through more than it would through a solid object. It’s not transparent, but it’s so thin and delicate it looks transparent. So we needed to tweak the intensity and color of the light for the birds. Each feather works almost like a half-transparent body. And, there is a delicate outline around it, so we have to keep that in mind. It’s not easy to work with feathers. They are heavy to load because a lot of data is embedded onto every feather. But, we’ve gotten used to it.”
If you’re lighting a white character for stereo, test it all the way to the end.
“Our villain is a white cockatoo,” Chisholm says. “White is always hard. We only have so many bits, so we might put a key light that seems OK, but when we add the other lights, we push the limit and the white is blown out. So we have to dial it down. But, when we bring it down, we might darken the already dark parts. There are many ways to work around not having the brightest value blown out, but basically we do it by controlling the highlight, the specularity. The other hard technical issue is stereo 3D. The glasses are tinted so the white doesn’t look as bright and happy as it should; it often looked gray. When we were lighting the cockatoo, we converted [the images] into stereo and went all the way to color timing tests to make sure the values were right.”
To light a musical movie, listen to the music.
“We had some sequences where we had to design the lighting to the musical cues,” Chisholm says. “In one scene the villain cockatoo is rapping and doing a funny flash dance act while a disco mirror ball circles around. A different color pops up with each line. Because he’s a white bird, he can absorb all the colors, but we didn’t want that to obscure his performance. So, we put on headphones to do the lighting and went frame by frame to perfectly time the stage lights.”
When you’re at the end of a pipeline, you catch everything.
“We’re the last people in the pipeline, so a lot of times we fix other departments’ work,” Chisholm says. “We can do shading as well as lighting. We might need to tweak the materials done in shading. Cover a mistake in assembling the set. Or debug an error to make a scene renderable. At Blue Sky, we are pretty strict about who does what, but sometimes it’s inseparable.

If you want to learn about lighting, start with a camera.
“I went to the Pratt Institute for computer graphics and learned a lot of what I know now working there,” Chisholm says. “But the second thing I learned most from was a tiny manual camera. I learned so much from adjusting the f-stop, changing to different lenses. I have a digital camera now, but I use manual settings. I think it’s really, really important. Changing one setting can screw up an entire photo. If you’re always using auto settings, it’s hard to learn.
Seeing the final image makes any previous chaos worth it.
“When we get toward the end and everything is late and you have to do it faster, things can be pretty chaotic,” Chisholm says. “I try to tell everyone in my department that you have to foresee problems, but it’s really hard. We never have enough time. But when it all comes together and you see the final render and finally go, ‘Ahhhh’… that’s the reward.”
