Hello animators! Dana Boadway-Masson, veteran mentor and animator, shows us how to approach facial expressions in your animation. We are in for a real treat today as she gives us insight in what to look out for, workflow techniques, and how to make your facial performances more dynamic. Get ready take your facial animation to the next level! Read on, get inspired, and enjoy!
– The Animation Mentor Crew
What is the purpose of facial animation?
Facial animation has a special function – it reveals what’s being processed in the mind of your character. And that is truly where we achieve the illusion of life, when we can make the audience believe that our character is thinking and reacting in a spontaneous manner. It doesn’t necessarily require highly detailed feature-quality animation rigs – this can be achieved with very simple rigs and very rudimentary character design – it’s all in the presentation and timing. Successful performances combine clarity and subtlety to communicate the thought process of the character to the audience.
How does thought process work?
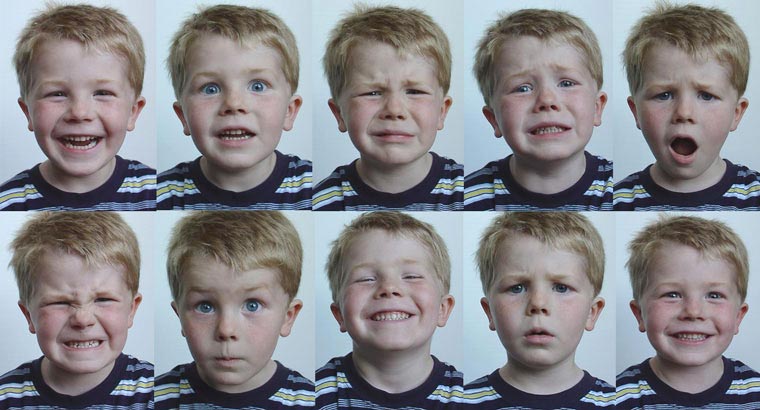
Just like any computer, the brain works with a combination of input and output. The machine needs information input to process. What is ‘input’? Input can be anything that affects a character’s senses – sight, sound, smell, taste or touch. Those 5 senses are input devices in a biological computer. These events can affect the character both physically and emotionally. A facial expression can reflect a reaction to a physical event (eg: a hit, or a tickle), or an emotional event (eg: seeing a pretty flower, or watching a loved one walk away).
The immediate reaction to a physical event might show a reflection of how the event felt physically, and would most likely be followed up with an emotional reaction – the event might anger the character, or delight him/her. The brain processes the event (input) slightly ahead of the reaction (aka, output).
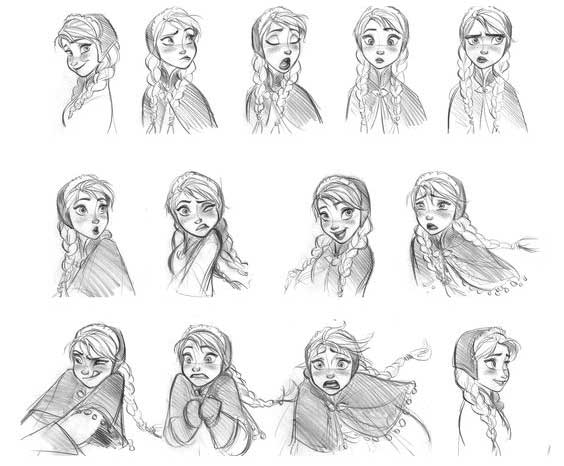
Blocking facial expressions – how to choose which, and how many?
When deciding what kinds of expressions you want your character to express, a good rule of thumb is the KISS method. Keep It Simple, Silly! Break the shot down. What is happening in the shot? How does your character feel about those events? Does something occur that changes that emotion? Most often, there won’t be a whole lot of big emotional changes in a single shot of animation. So there might be one or two that you have to deal with. Start with the main emotion that starts off the shot, and then identify if there is a change, and what the new emotion will be.
Then… Pose out the expressions! Create the first pose, and bookend the ‘hold’ of the pose with a pair of copied keys, even if you’re using stepped keys. Create the second pose the same way, and so on. Do not worry about posing the facial on the same key frames as the physical pose blocking. Facial and body pose changes should be treated as separate entities. If a physical pose change happens at the same time as a facial one, the facial becomes easily missed by the audience, and it’s the facial one that cues the audience that the character is going through a thought process.
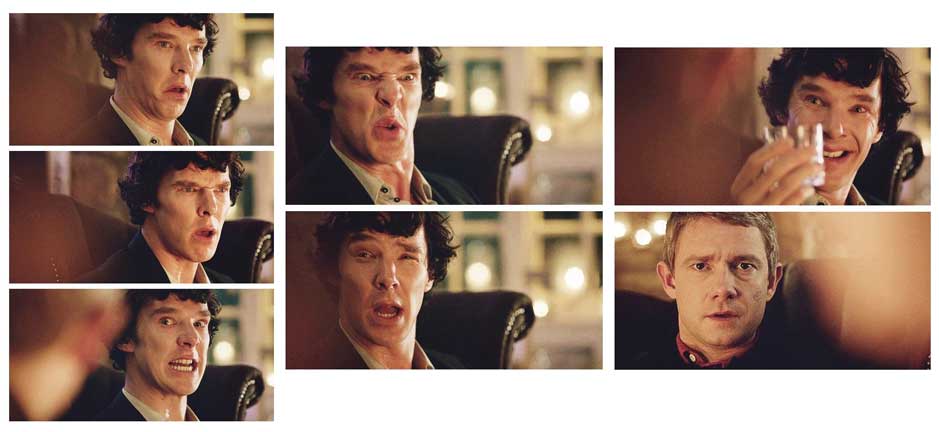
Benedict Cumberbatch in the TV show, Sherlock. Notice his expressions and emotions change in the span of one sentence.
Blocking facial expressions – how to determine the timing?
In order to figure out where on the timeline you should key subsequent facial expressions, you need to understand at what point your character is reacting to stimuli. If there is no real *change*, per se, then you can work out where your character is feeling the emotion more, or less, intensely, and then work the timing of the expressions according to that (basically the same expression, just dialed up or down in its extremes).
Emotional Hang Time – what is this?
Any time there is a changeover of forces in animation, there needs to be hang time, or else the motion makes the object or character feel like it’s struck a hard surface and bounced off. This is handy if your character is crashing into a wall, but not so good if you want them to be changing direction of their own volition. If you look back at the good ol’ bouncing ball, the spacing at the top of the arc becomes very small, slowing down the action. The force of the energy of the bounce is running out, and the force of gravity is starting to take over and pull it back down. The hang time shows off that changeover of forces and visually describes that unseen energy change in a way the audience can understand.
You can use this same idea in performance as well. Emotions don’t just change on a dime. They require input and processing before they can output. So for example, if your character were walking along feeling pretty low and sad, looking at the ground, then sees a cute chipmunk, which cheers them up, there needs to be a beat of time where the character is ‘seeing’ the chipmunk, and processing what they’re seeing. So in essence, there would be THREE expressions involved in a two-emotion exchange. Sad —-> neutral/less sad/distracted out of the sad emotion —-> amused/happy. In that moment in between the main emotions, the character is taking in and processing the input (in this case visual) that they can then react to. If your character moves from one emotion to another with no emotional hang time, the performance will feel forced and fake – that sudden change without reason is jarring, just like a quick physical direction change would be. That doesn’t mean that the emotional hang time can’t be quick, because the brain certainly can process very quickly. It all depends on the character’s state of mind as the event occurs, and how high or low the energy of the event itself is. It’s all about proportion.
How do you decide what expressions to use?
The most intuitive thing to do when deciding this is to internalize what the character is feeling. Try to get into the character’s head, and imagine how they are feeling, and act it out yourself. I think most people can do this fairly well… empathy is the human trait that draws an audience in and makes storytelling possible. Use this to create some video reference, or even stills, and keep a small mirror at your desk so you can do spontaneous expression checks. This, plus an understanding of what creates appeal with the particular character you’re working with, will serve to help you with the expressions.
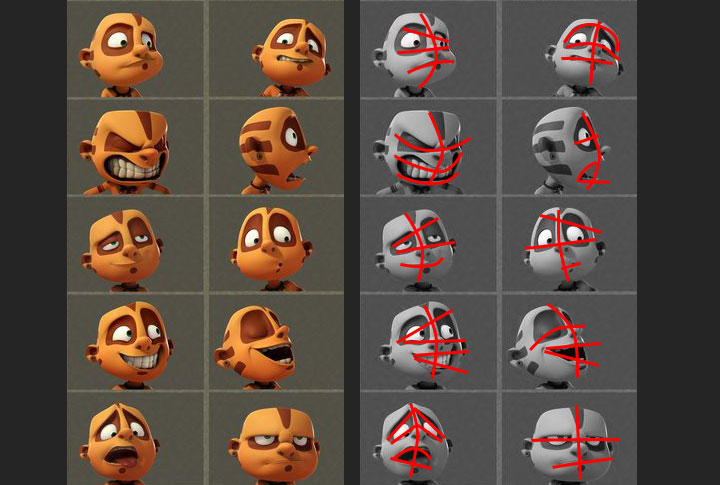
Great facial expressions with this CG Model from Gordon Pinkerton
What makes a good facial pose?
Facial poses can be constructed very much like body poses. Basic building blocks of poses: line of action, shoulder angle and hip angle (contraposto), translate on the face into: Line of action (between brows, down the nose, through top/bottom lip and center of chin), brow/eye angle, and mouth angle (contraposto). Like any rule of thumb, this can successfully be broken, however, this is a great way to get yourself started, and it works the majority of the time. This method helps to create asymmetry, and a flexible, ‘fleshy’ feel. It also helps in terms of adding more exaggeration to an expression.
Dialogue blocking… When in the process should this be done?
When there is dialogue in the shot, that is one part of the shot that is set in stone. You can’t change the timing of it, as the animator. It creates the rhythm of so much of the shot, and it’s good to tackle this part relatively early on so that you won’t have big jaw and mouth movements hitting at the same time as other body movements. So I like to block in the jaw movement right after blocking in the facial expressions. I want the dialogue mouth shapes to be affected by the emotion, so starting with those emotional expressions first helps keep the mouth shapes from being too ‘generalized’ and symmetrical.
I start with figuring out where the jaw opens and closes (and it’s always much less than you think it will), by putting my hand under my jaw and repeating the dialogue over and over with my eyes closed, so I can really *feel* where the biggest emphases are. The KEY to this is to say it as exactly like the voice recording as you can. I’ve seen animators create mouth shapes that matched up to their own particular accent, rather than the accent of the voice actor. You have to really HEAR what the recording sounds like. I know that sounds like a no-brainer, but it’s amazing how easy it is to hear the voice in your own head and animate to that, instead of the audio in the file.
Along with identifying the bigger, open-jaw timing, I also work out the timing of closed mouth shapes – M’s, B’s and P’s. Just about everything else can be ‘neutral’… Jaw very slightly open.
The last big thing I like to do when blocking in jaw movement is to identify where I might be able to use rounded jaw movements, or push the jaw more to one side or the other in order to help push the formation of sounds, and create movement that’s not just straight up and down.
If you do this jaw blocking correctly, a surprising amount of the dialogue articulation can be achieved using only the jaw movement. The rest is all icing on the cake!
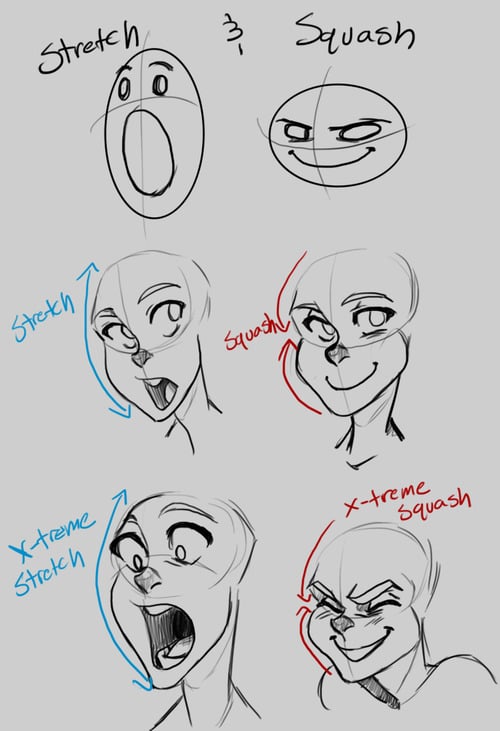
Illustrating the squash and stretch concept with the head from Zohbugg
Tips on Eyes
Eyes can be tricky business. One of the hardest things to nail sometimes can be eye direction. Just remember that the only view that counts is the camera view. If the eyes don’t look like they’re focused where they should be focused from the camera view, then it doesn’t matter if the character’s eye target is positioned right where he should be looking, or not. More often than not, you need to cheat the position of the eyes to make it *look like* the character is looking where he should be, when you’re looking at the character through the camera. So always go back to the camera view to be sure. Sometimes you need to adjust the eyes individually, as well as moving the main target. To focus on objects further away, the iris position needs to be more parallel. To focus on something much closer, the iris position needs to be more ‘cross-eyed’.
Eye darts can be easily overdone. Be judicious about where and how many of these you use, as these create rhythm, mood and expression. A lot of eye darts can denote nervousness or excitedness, or lying. Few of them can express anger or seriousness. Anything in between can be used to create a layer of staccato rhythm in the shot, or to express that the character is pondering something. Eye darts that are too fast feel like ‘pops’, and too slow feels like a drift, and lacks focus. There needs to be a long enough hold in between darts to allow the character to appear to focus. Eye darts are one place in character animation where a linear arc of motion is appropriate.
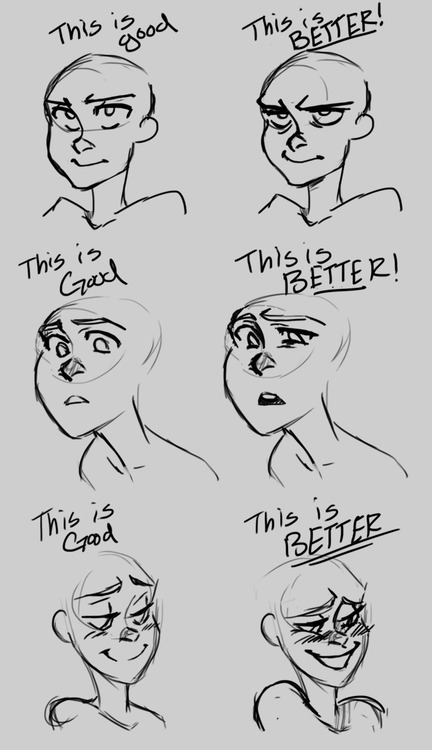
Pushing the brow and eyeline expressions from Zohbugg
Order of Operations
Here’s another rule of thumb to help with creating a sense of natural thought process in a character… The order of operations. What happens first in the ‘chain reaction’ when a character is responding to something?
Generally, they eyes are the first part of the face to give away that the wheels are turning in a character’s head. The eyes and brows start to react first, then the facial change radiates out from there. And body changes will happen slightly following facial changes, too. As I mentioned before, if facial and body changes happen at the same time, it’s easy to miss the facial, especially if the body change involves a big transition movement. But it makes sense for the body to follow slightly behind, since the physical reaction tends to happen in response to the thought process.
I kind of think of it this way… Whatever’s closest to the brain moves first, and successively down to whatever is farthest away. Again… Rules of thumb can be successfully broken, but it’s great to have an idea what you can start with, especially if you’re not that experienced.
There is SO MUCH to consider when you’re putting together an animated shot, and what I’ve covered in this post is really just a drop in the bucket. It’s the basics of working with the character’s facial expressions… Getting started with that blank canvas of the default-rig-position can be quite daunting. Having a plan of attack and working from broad strokes first, and down to fine details later on, is the key to getting past that blank canvas and creating a living, breathing person to entertain your audience and tell your story.
Dana Boadway-Masson is an animation veteran and also a senior mentor at Animation Mentor since 2007. You can see some of her work in Halo 3 (video game), The Little Painter (short), and Flat Frog (video short). She’s also written, produced, and directed her own work. Dana currently works independently from her own small studio, Killerjellybean, and has taught Body Mechanics, Advanced Body Mechanics and Introduction to Acting.
More Posts from Dana Boadway-Masson
Be Brave: 7 Ways to Overcome Your Insecurities for Animators
10 Advanced Acting Performance Tips for Animators