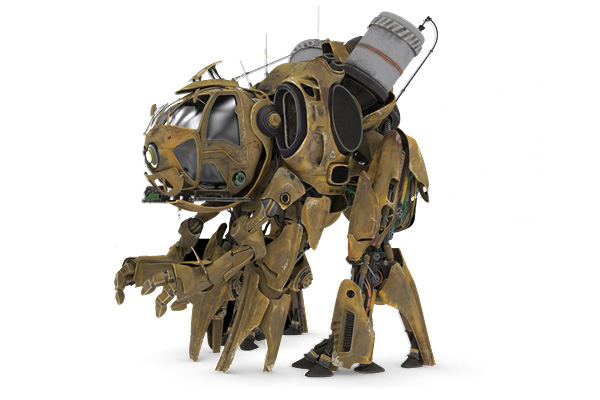
Hatch (featured in the video above) joined the lineup of Animation Mentor assets just last week. He is ready to kick ass and bring his awesome textures and surface into Maya Workshop: CG Lighting and Compositing with Autodesk’s Mental Ray. He will also be available to students in VFX Fundamentals program to render using Solid Angle’s Arnold.
Hatch was created by an incredible team of VFX professionals including Texture Artist, Aaron Wilson. Today, we are thrilled to have Aaron stop by the blog to share the surfacing guidelines he used when creating Hatch. He also produced a short tutorial on how to create a dirt mask in Modo. Big thank you to Aaron for his fantastic work on Hatch and sharing his knowledge with the community.
-The Animation Mentor Crew
—
By: Aaron Wilson
1. Ask yourself a couple of questions
This is important. It can help you find direction. How was it built, where was it built, and why was it built?
2. Gather reference
Thinking about how this asset works, where it has been stored, and how long it has been it in use helps narrow our search for relevant reference.
The first thing most of us do is dig online. This is fine if you know what your looking for. Sometimes the best reference is right there in front of you. It can be the way an exhaust pipe looks at a local BBQ restaurant or an altered photo which creates a useful stencil.
3. Learn the asset
This is very helpful on larger assets as it can establish a way to maintain structure. On the flip side, you convince yourself how hinges, pistons, and panels might move and shift. Define areas where wear and tear could be justified.
4. Material and color palette
Think about how this asset can be used and knowing the reference — decide on materials and a color palette. Hydraulic pistons are typically chrome, dark cast iron, bronze, and various colored rubber hoses tend to be a good way to add color breakup.
5. Focus on the big picture
With an idea of a material palette in place, begin to think about how to keep things organize. Work on setting up all your texture effects. Share & adjust layers from the color channel (when possible) to be flexible.
6. Experiment
Keep focus on the big picture and try and avoid the smaller details. Feel free to experiment while keeping in mind the reference and try to replicate, because good things can come of it.
7. Define environment details
These are details that will apply to the entire asset. Some examples might include dirt and rust or a gradually color desaturation from top facing surfaces.
8. Define material details
Some examples or materials details are dusty rubber hoses, chipped painted metal, oxidized copper.
9. Refine scale and directional details
At this point just touch key select areas with logos, rust, and select areas of dirt around hinges and exhaust vents.
10. Pull it all together
Shift focus onto other maps like bump, and specular and balance where needed. Try doing renders … adjustments can be subtle and these effects can be important when trying to help get the “look”.
—
Ready to light and render Hatch? Register for Maya Workshop: CG Lighting and Compositing today.

