
As a long time character animator, I’m often asked about how we do what we do and what are my favorite parts of our crazy, convoluted process. What was true for me in the hand drawn 2D days still holds true when I’m animating on a computer: I love animation timing. Timing involves a few simple principles: how quickly something moves and how long it stays still. Slowing something down in time adds weight, gravity, and mass. Speeding something up adds a sense of speed, lightness, and energy.
You had to really make the most of the screen time you had, and make every frame count.There are many ways to apply these principles to our work, but probably the simplest way to describe it is to go over my process when I started a piece of 2D animation done with pencil and hole-punched paper. I get briefed by the director(s) on what they need out of the scene/shot. I then go to my desk and start thinking on how I want to approach it. If it’s a heavy body mechanics shot, I might look to YouTube for live action clips that feature some of what I’m trying to do. If it’s an acting shot with a voice track, I’ll look at live action reference of the voice actor—or another actor whose physicality matches what I think the shot needs—and try to decide how I want to portray the action.
Timing involves a few simple principles: how quickly something moves and how long it stays still.I will sometimes do small thumbnails to work out potential posing problems, and, if warranted, will shoot quick and dirty video ref of myself or a fellow animator performing several versions of the shot. This helps me get a clear idea of where I want the shot to go, what I want the animation to be about. Once my ideas are clear, I sit down at my desk and start animating. I create a series of drawings that relate to each other, creating as many as I need to make sure my intentions are clear and that the action read. I number my drawings in sequential order 1, 2, 3, 4, etc. Since I’m using a 2D shot as my example, I’ll circle my main keys and underline my main breakdowns—in-betweens and partials are just numbers. (A “partial” is a drawing with only certain important parts drawn.)
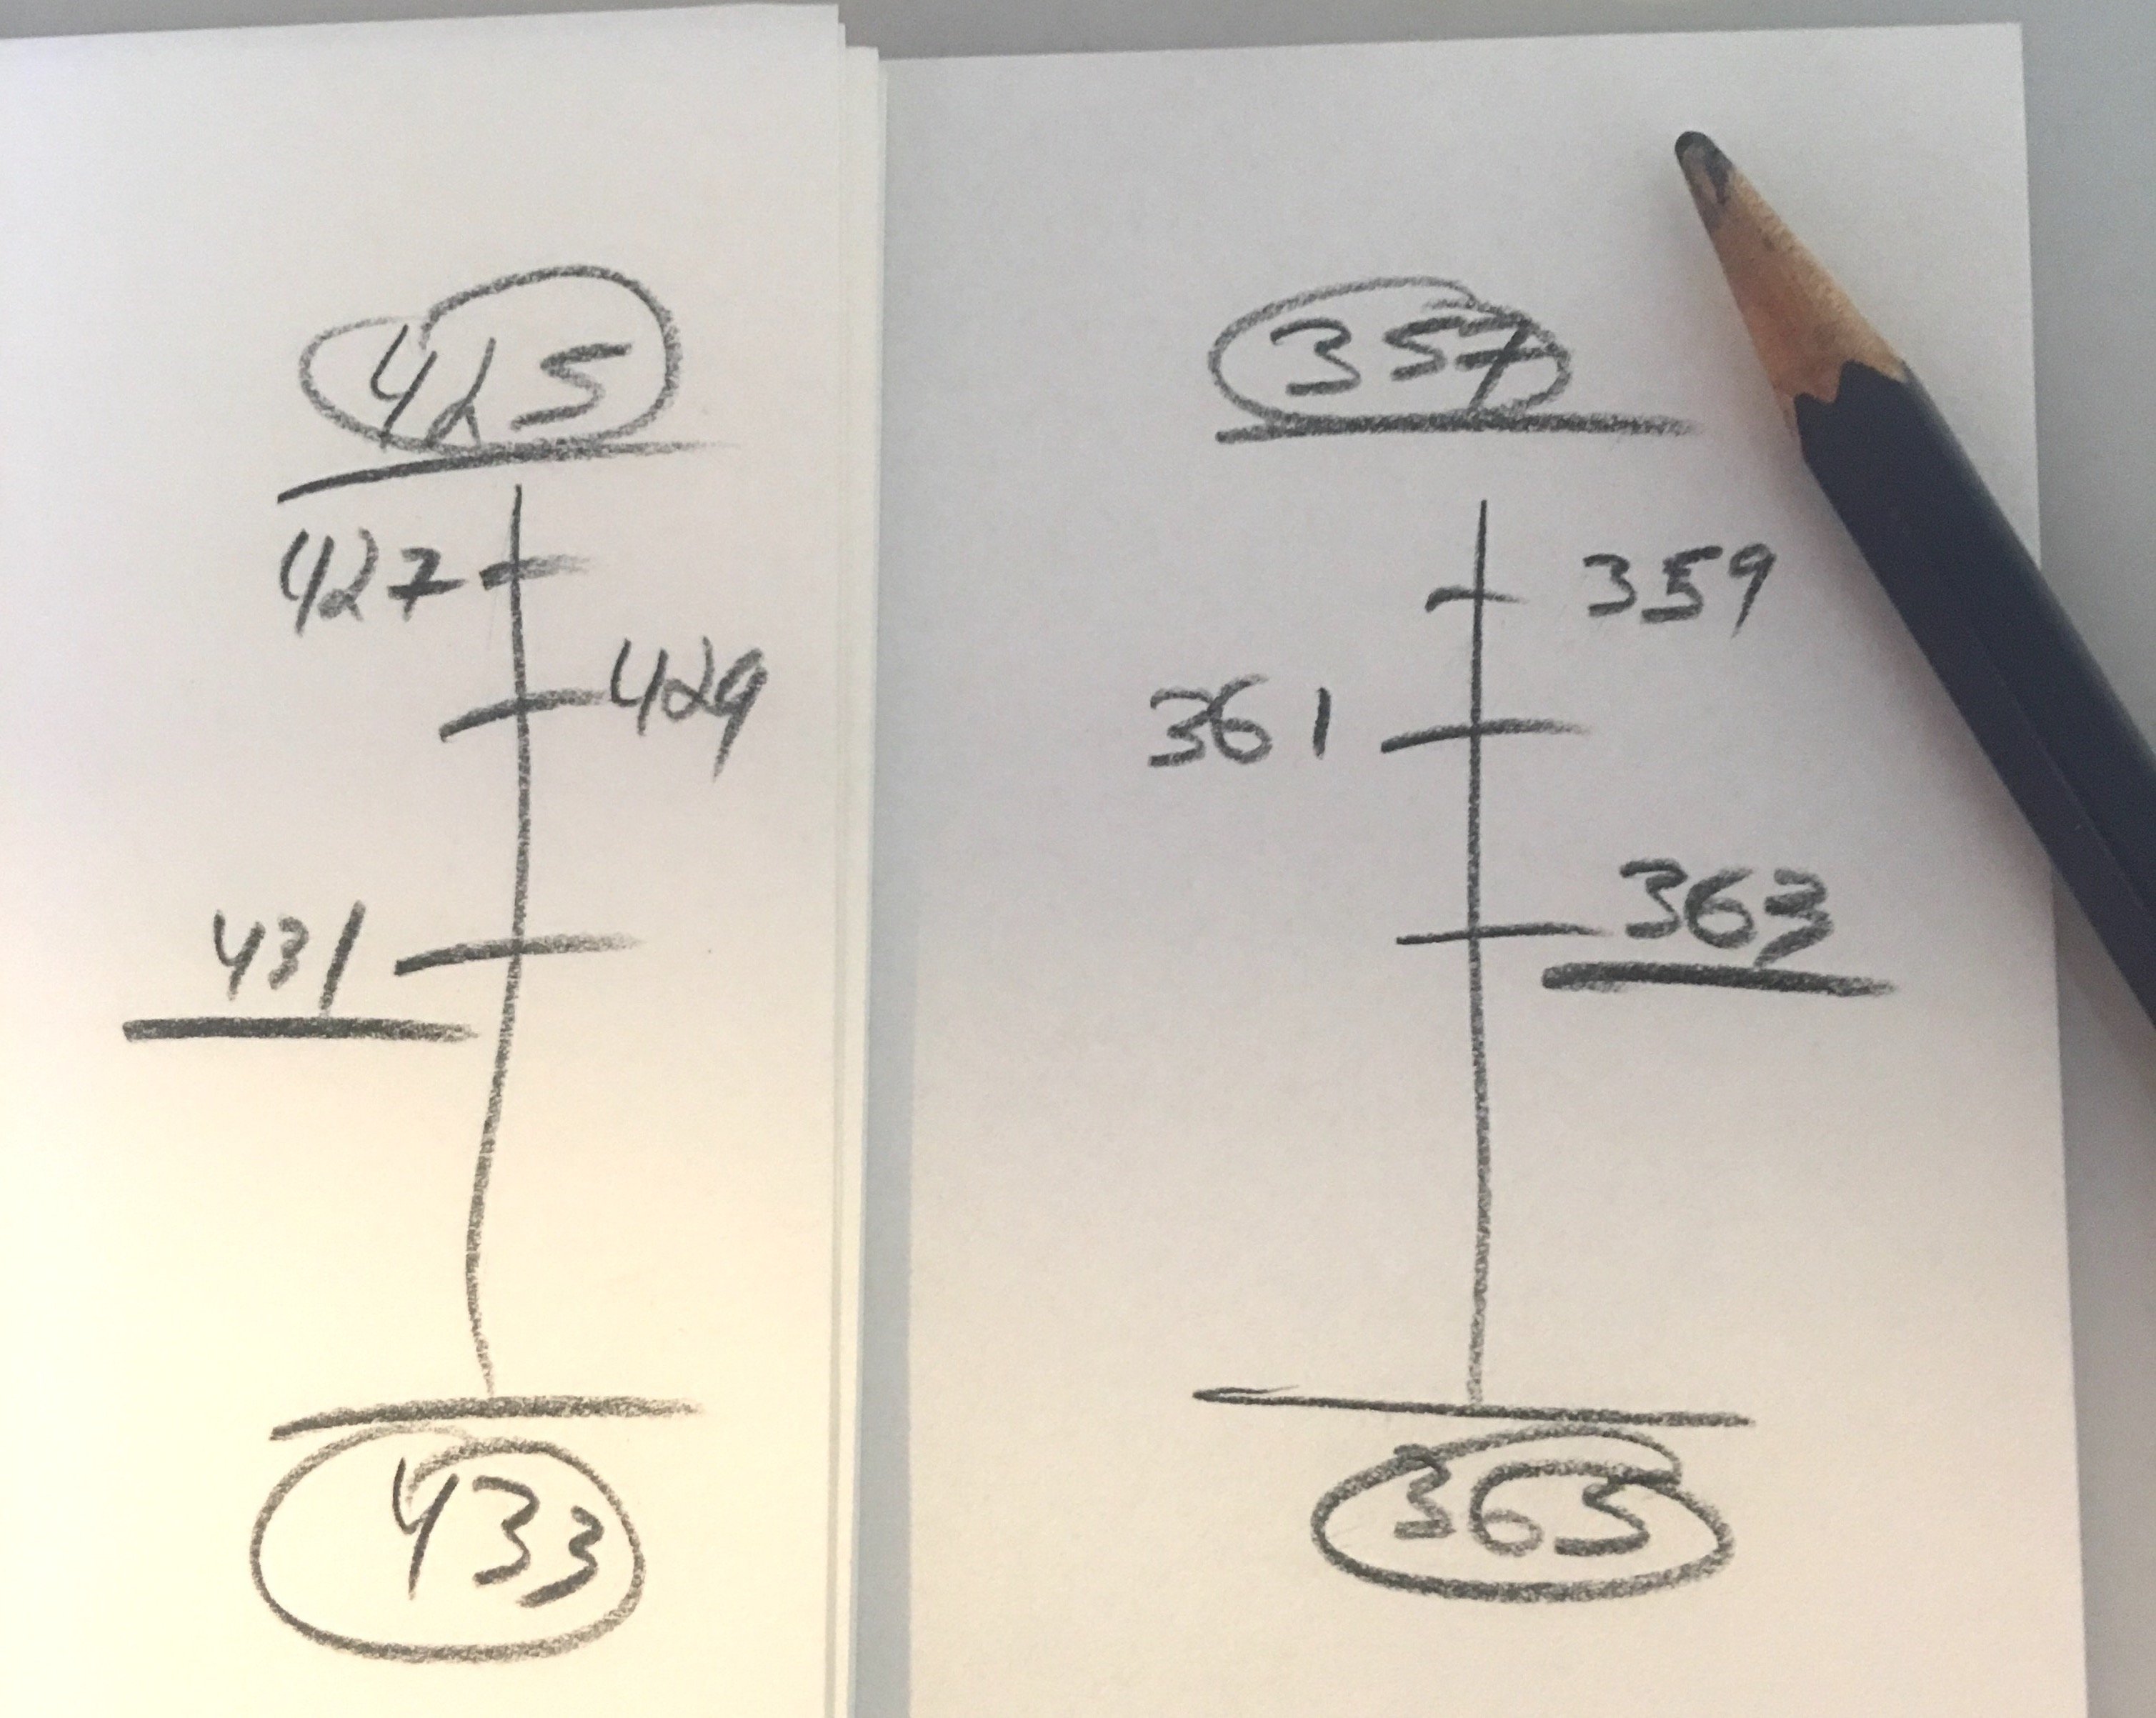
Example of a 2D Timing Chart
This is when I start timing my shot—and for me, the fun really begins.After adjusting the timing, I’ll hit play and suddenly the smoothness of the action is gone, and my main poses were on screen long enough for the viewer to read them, to understand what the character is thinking/feeling/doing. It should now be very close to the actual 5-second editorial length. As I watch the shot play, I’ll adjust the holds to get the best possible read on the action: this 6-frame hold will change to an 8-frame hold, that 4-frame in-between is sticking, I’ll change it to 2 frames, etc. I then ask myself a lot of timing-specific questions: Does the pose read better if I hold it for an extra 4 frames? Does that make it funnier or just dull? Will speeding up a transition action work better so I have more time on my main pose, or does the quicker action confuse the viewer? Do I need 2 more frames on my 4 frame anticipation to really get it to land? Does the top drawing on my arc need another few frames for more hang time? When I’m totally satisfied, I’ll renumber my image series, changing the sequence to actual frame numbers: 1 (held for 10), 2 becomes 11 (held for 4), 3 becomes 15 (held for 2), 4 becomes 17 (held for 1), 5 is now 18 (held for 2), 6 is now 20 (held for 6), 7 is now 26, etc, and add my notations for how I want the shot to be in-betweened. These numbers make it easy to transfer the info to the exposure sheet so the camera person knows how to shoot the scene, and once it’s fully in-betweened, the numbers are updated again. This was how I worked in 2D, though I did work with other animators (Eric Goldberg for example) who committed “time numbers” to their drawings before they went to the pencil test stage. I was amazed that they could do that, and do it so successfully. I never really tried that method, and I enjoyed my slightly more organic way of working. When I switched to animating with the computer, I would often start a shot like that, creating pose after pose on single frames, paying attention to how the poses related to each other and not to how long they were on screen. I’d often create a copy of a pose and tweak it and A-B the original copy to see if I could improve it. If I did, the original would be deleted. If not, the copy would be cut. Once I was happy with my poses, I’d start to slide the poses around in the timeline. In the early days, I’d work with stepped curves, and moving the poses around was pretty straightforward. As my workflow strengthened and solidified, I stopped working in stepped mode and began working in copied pairs using a plateau or clamped curve type, where I’d create a copy of each of the poses and slide how long each pair was held. Obviously in a shot with fast action or a walk, some of the poses/in-betweens would not need a copy to read. The amount of time I held my pair determined how long the pose would read, just like in the 2D days. And working this way meant I never switched my major motion curve type; to me, going from stepped to spline was always scary and destructive, so I stopped doing it.


