Yasin Hasanian is a talented CG artist from Iran. His work speaks for itself, but we want to applaud Yasin for his incredible imagery and for sharing his process with our VFX community.
See more of Yasin’s work.
Check out Yasin’s work and tutorial in 3DArtist Magazine Issue #61.
Learn more about the Animation Mentor VFX program.
-The Animation Mentor Crew
—
How did you end up in VFX work?
YASIN: I’ve been interested in VFX roughly since Big Bang! In fact, when I was a kid I always used to live in some fantasy dreams and wondered how to bring them to life. Often I tried to draw them but because I wasn’t good in drawing at all which still I’m not, I wasn’t really able to illustrate them. At the age of 14, I became really interested in 3D and thought this might be the way to go to illustrate those dreams, therefore I bought a book about Maya and started learning it. It was a very basic introduction to Maya and didn’t tell me anything interesting really, until a year later that I found out about 50 Gnomon DVD series about Maya. I never forget this, I didn’t have enough money to buy them so I had to ask my parents for some money and obviously it wasn’t easy to get that large amount of money, so to earn that, I cleaned all our house walls and in return my mother grant me the money to buy them, haha, and I promised her you won’t regret giving this to me. Buying those DVDs, everything just changed for me and I got determined that this world of VFX is where my career going to land.
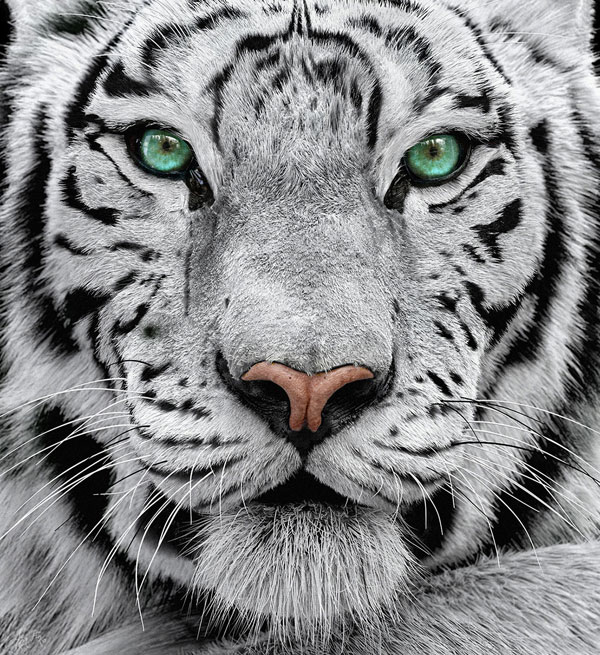
Can you explain for workflow and key insights you learned while producing your tiger image?
YASIN: Working on the tiger image (Cold as Lava) was an absolute pleasure. Hair and fur are often tricky to do and there is no one definite solution to create a pleasing result in all cases, for instance, short hairs may incorporate a different approach than long hairs and so on. One workflow that I seriously tried for the first time was treating the tiger fur in two different stages, prototyping and production.
In the prototyping stage, the idea is to preview the final product in a really rough and quick way in the beginning of the work, the reason being, producing works that contain hair or fur stuff usually tend to become time-consuming and laborious, therefore you need to be able of making sure that the project is advancing on the right track by previewing the final result in a progressive manner and from the start. Thus, in this stage I relied on ZBrush (Fibermesh), I tried to be as fast as possible and not caring about the details much, basically, the direction and length of the fur mattered the most to me.
In the production stage, the fur almost has to be done again but with a big difference. The fur is quite sparse and the result of this step in ZBrush will be sent directly to the host application such as Maya to be used along with a third-party hair plugin like Shave and a Haircut. Hence, the fur should be accurately groomed in ZBrush. Afterward, the Fibermeshes were exported to Maya and converted to curves, and then Shave and Haircut would use those curves as its own guide curves to grow fur out of the root geometry.
This workflow may seem to take some time at first glance, but the trade-off is, it is far less prone to any undesirable outcome and headache in the end, as it has been produced progressively.
The renderer for this project was obviously Arnold as well and it simply delivered a brutal performance while giving me utter reliability despite having a very heavy scene.

The 5 things you should know about the Arnold Renderer…
YASIN: Arnold is such a beautifully designed renderer that is both powerful and easy to learn at the same time which is pretty unique among other renderers!
1. Arnold is a brute force renderer, meaning you do not have much control optimizing the render speed, however, there are a few principles to follow which helps decreasing render time dramatically. Always work your way up by increasing the samples from bottom to top. Start with light or shader samples then based on your scene, increase diffuse, glossy or reflection samples and finally AA. The only case you would ever need to start with AA is when you are having DOF and/or Motion Blur activated. Therefore decrease all the other samples and increase AA until you have a clean render.
2. Whenever you are done creating your textures, convert them all to .tx format and save yourself a noticeable amount of render time. To do so, Arnold offers makeTx in the MtoA bin folder and Tx Manger right inside maya under the Arnold menu. One simple way replacing these new converted textures is turning on “Use Existing .tx Textures” under Textures roll-out in render settings.
3. Arnold itself does not offer a layered shader but you can layer your shaders on top of each other using maya’s own layered texture, plug that into a surface shader as a pass through and finally assign that to your object.
4. If your scene is large and heavy, it is much more efficient to export heavy meshes as standins and use them instead. Even if your mesh requires displacement (static), you could simply ignore making a displacement map, just turn your high poly object into an standin and use that. This will skip the displacement tessellation process while rendering. Remember that Arnold chews polygons beautifully!
5. MtoA IPR is absolutely amazing! Get yourself accustomed to it. It even supports a lot of node initializations, meaning, while you are in IPR mode, you can alter displacement features and create objects, shaders or lights and it will just render them for you instantly.

How do you keep current with VFX software training?
YASIN: I have a rule for myself, software don’t limit you; it is your imagination that limits you. Frankly, knowing the fundamentals of art or science related to your field of computer graphics career, whether it is dynamics, shading, animating or such, is an absolute prerequisite. I’m telling this because I learnt this the hard way.
At first, I thought just swallowing an application and figuring out what every slider and button does, would make a master of me, but I was totally wrong. It actually lies in the science behind it. If you know the fundamentals, then you would know how to achieve a certain result in reality, because, based on those fundamental elements, you are able to realize the requirements that provide you to get to a decent outcome.
Additionally, knowing everything about a VFX software goes to a much lower priority and instead, you’d master a part of an application naturally that suits your need best after a lot of experimentations with it. Therefore, your need will help you keep current with all sorts of programs and plugins, and fortunately there are plenty of sources online that are available to bring you up to the speed.
What is the most critical asset you believe a VFX artist can have?
YASIN: PATIENCE! Believe it or not as the work gets more complex you have to get more patient too. The project becomes like a long chain that every part of it is dependent on the next one and if one falls apart, the whole chain falls apart.
All of us have experienced giving up on some projects at some points (at least myself), but what can always bring you back to the project is a determined patience. This will help you learn a lot from your past failures and do 99% better for the next time. It is of course not possible to earn this trait in one day but be sure it is really rewarding in the end.

