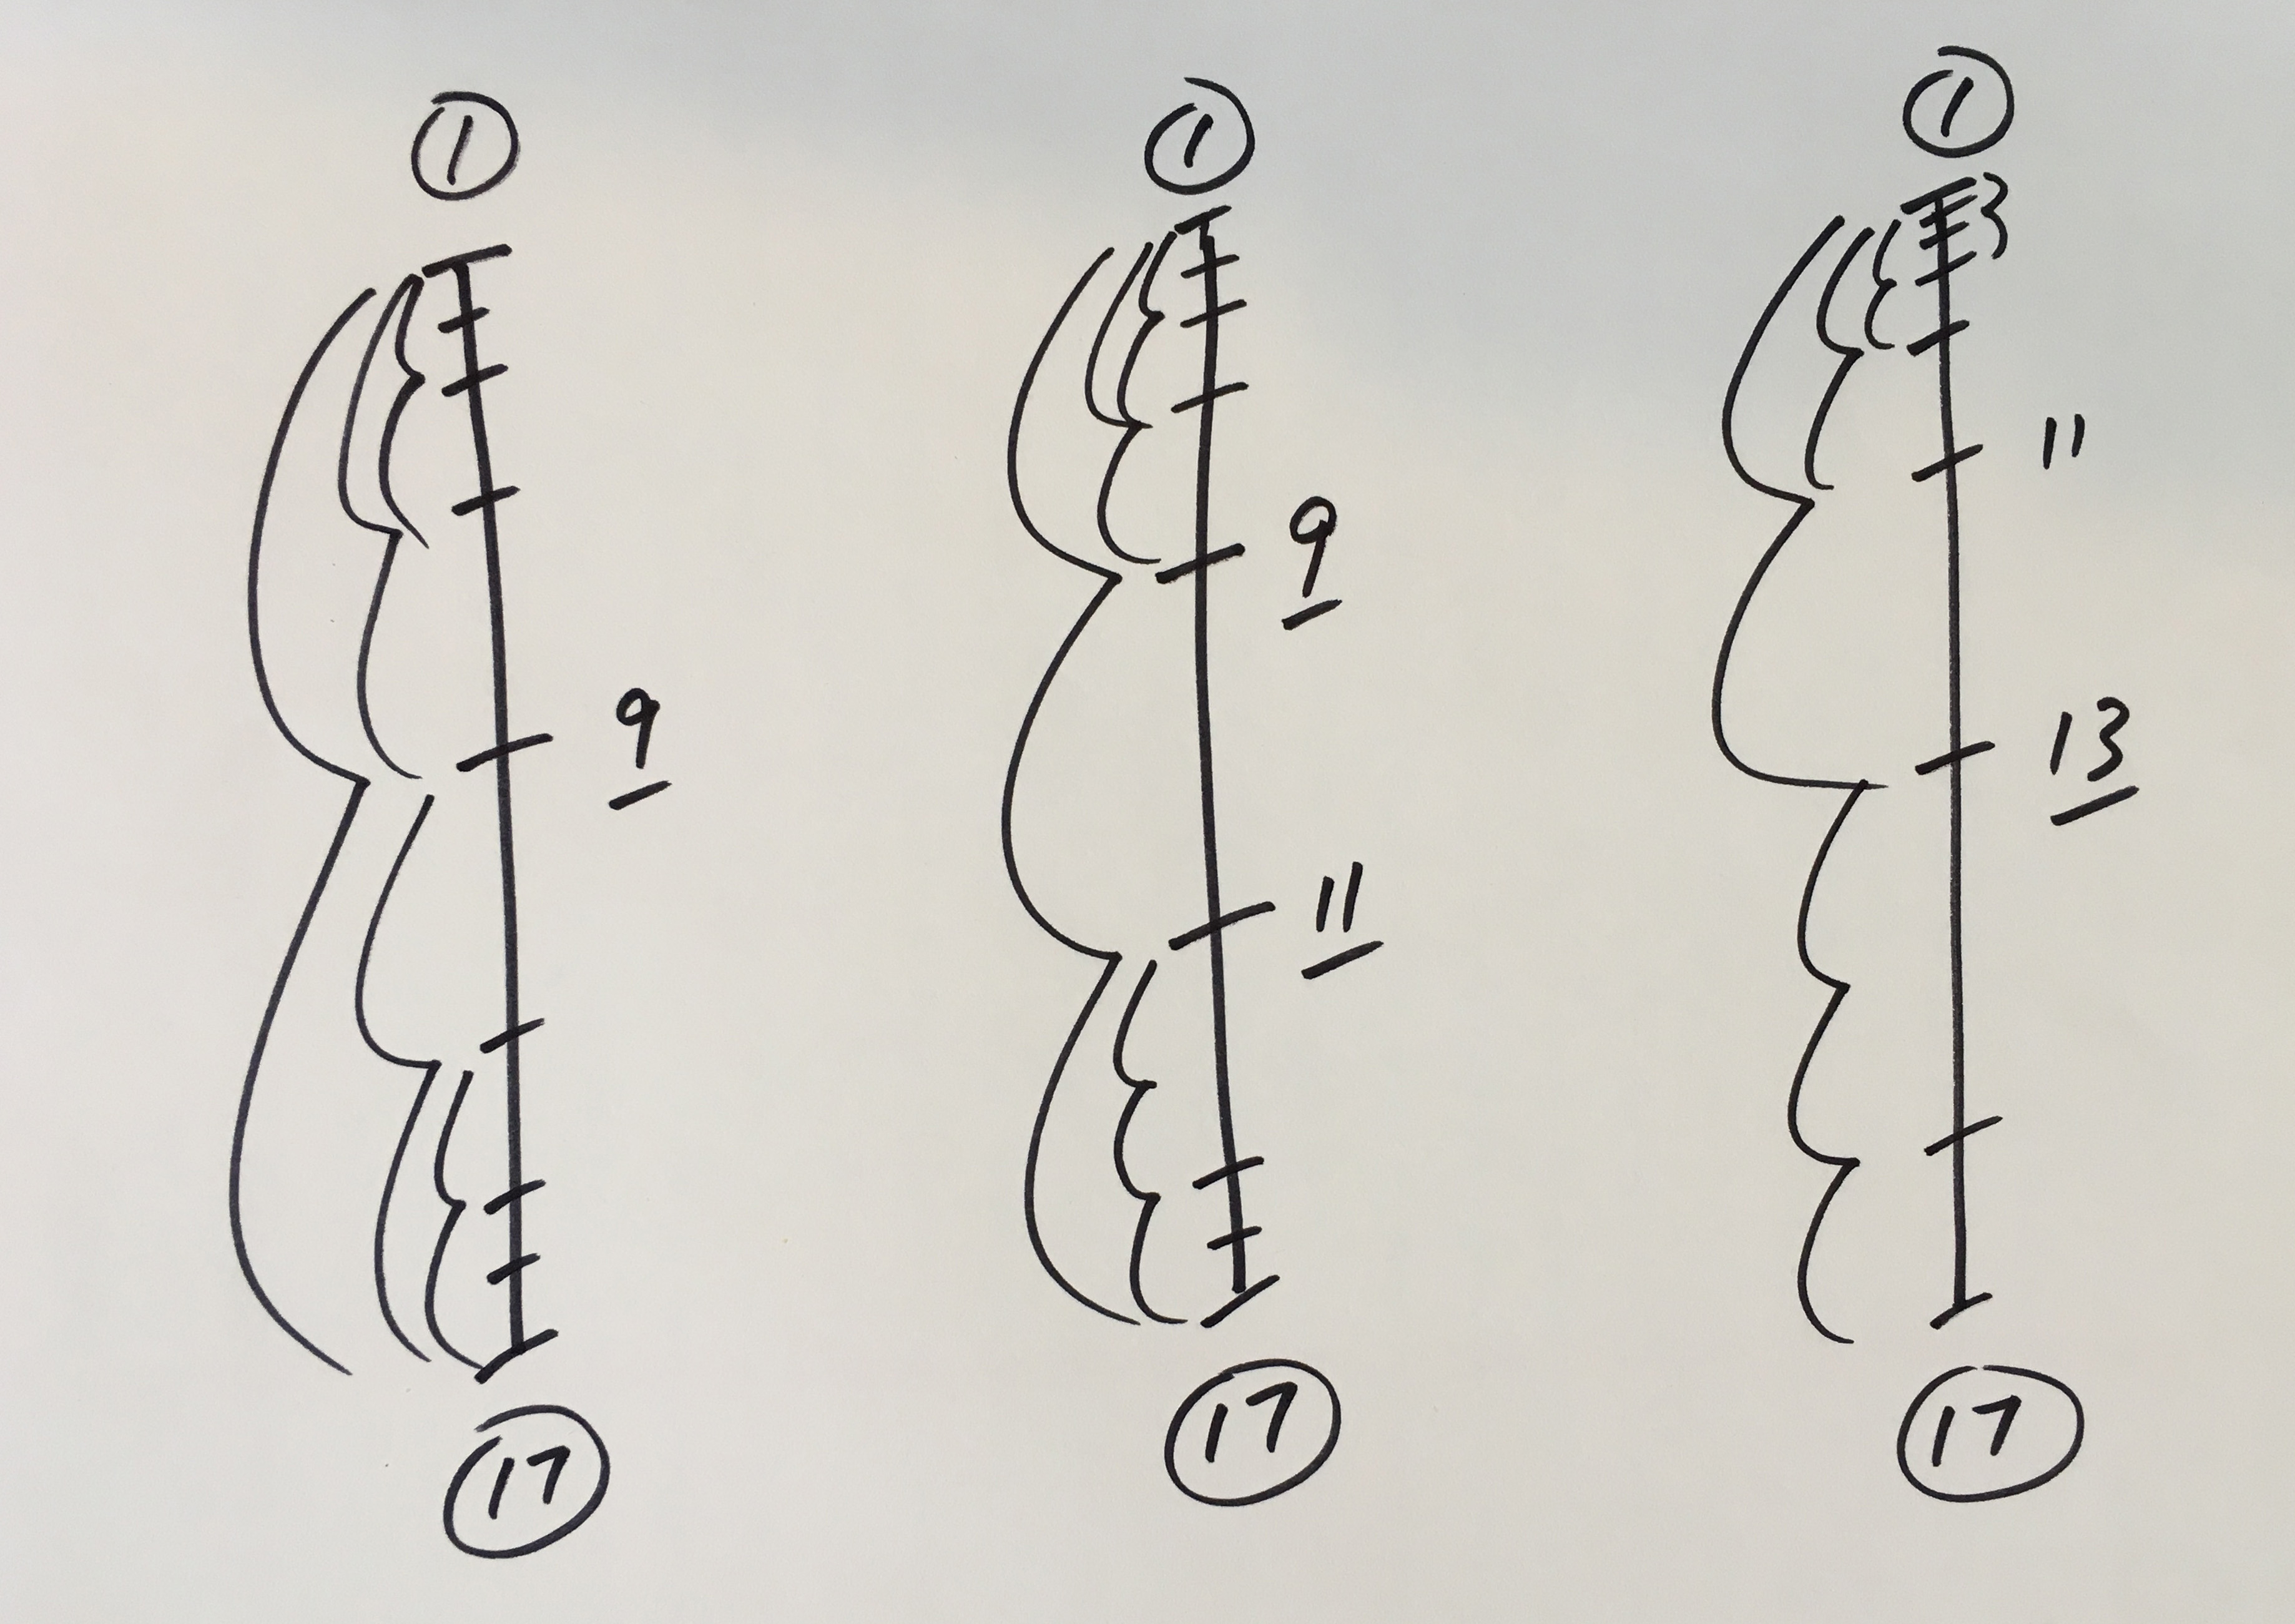
On a basic level, Slow In and Slow Out describes the tendency of things to come to rest, or to start moving, in a progressive way. This is a principle that most people understand pretty quickly, as it’s easy to observe in life. More technically, this principle tells us that when we animate something moving from a stop, the spacing of that object needs to progressively increase (widen) until it gets up to speed, at which point the spacing becomes relatively constant. And when that object comes back to rest, the spacing progressively decreases to zero. Spacing is a term that comes from the days of animating on paper. It’s slang for movement from frame to frame. Put a few sequential animation drawings on the pegs, turn on the bottom lights, and you’ll see the drawings superimposed on each other. The space between analogous parts of the drawings shows the movement. Big spacing changes between drawings means large movements. In the early days of hand-drawn animation, even spacing was commonly used (which gives the same effect as linear tangents in Maya). No slow out, no slow in, and equal movement between every drawing. The movement was abrupt, then smooth, and mechanically unnatural. Here’s Dinner Time from Van Beuren Studios, released just before Steamboat Willie in 1928: Savvy animators came to realize that objects accelerate when they start to move and therefore they needed more drawings there. This became known as a slow out, because the extra drawings slowed the action down at the beginning of the movement, just like in real life. Conversely, the gradual reduction in speed when coming to a stop, again portrayed by extra drawings, became known as slow in. By varying the number of in-betweens, the nature of the slow in or slow out is made more gradual or more rapid.
Spacing changes show acceleration and deceleration
How many times have you had someone suggest you “work on your arcs and spacing”? Arcs is a pretty clear concept, but spacing outside of slow in/slow out is less intuitive. What do mentors mean when they say your spacing is off? Get ready for some physics! Trust me, this will be useful. Remember the concepts of acceleration, velocity, translation? That’s what slow in/slow out really refers to. Here are some quick simplified physics definitions: Position: where something is in space Translation: movement from one position to another Velocity: the rate of change of position over time (speed with directional information) Acceleration: the rate of change of velocity over time Position is where we’ve posed our character. Translation is how far we move it, on a subsequent frame. Both velocity and acceleration bring time into the mix. Velocity is movement through time (i.e., the number of frames between the poses). For a given translation, adding frames is adding time, meaning the velocity becomes slower. Acceleration describes how velocity is changing over time. Put simply, acceleration is in the spacing. That’s the key concept here, so ponder it until it’s clear. When the spacing is increasing, the object is accelerating. When the spacing is constant, there is zero acceleration, and the velocity is steady (as in a typical walk or run). Decreasing spacing is negative acceleration, or deceleration. It’s that simple. The more gradual the spacing changes, the gentler the acceleration, and vice versa. The most common spacing mistake is having spacing that increases and decreases erratically, often from frame to frame. Objects tend to move in arcs, and it doesn’t make sense to have an object going off it’s arc for a frame or two here and there. A path of action is a series of meaningful arcs. In the same way, in the vast majority of cases, objects accelerate or decelerate in a logical fashion, and all those accelerations and decelerations together make up the nature and rhythm of the movement. Spacing should be progressively increasing or decreasing in a meaningful way in each section of the overall movement.Maya spacing is generic
Realize that, while Maya spline tangents of whatever flavor give us very definite slow ins and slow outs, they are also computerized, generic guesses at the right acceleration/deceleration. You need to define the spacing of the movement in your animation, based on your character’s physiology, personality, and the style of animation. You also want to bring in the concepts of overlap and follow-through, by not having the same spacing for different parts of the character.Bonus physics! Force = mass x acceleration.
One great way to make spacing work for you is to understand the equation f=m*a, which can be rewritten as a=f/m (acceleration equals force divided by mass). For a given force, a more massive object will accelerate more slowly, which we know means the spacing must increase more gradually. That’s more drawings or more frames in the slow out. The massive object can go as fast as the lighter object, but it won’t accelerate as quickly. Think of a 300-pound lineman and a 90-pound gymnast in a sprint running over an obstacle course. If you want a character to appear massive, you need to give it more frames to slow down and speed up as it moves. Another common spacing error is to have spacing changes when there is no force acting on the character. How often have we seen a character run and jump, and after they’re airborne they speed up (spacing increases)? Or their forward movement, in the air, changes spacing from frame to frame. Of course, we almost always have the force of gravity pulling things down, and that’s why when a character is falling, the downward spacing increases until the character hits the ground. This is another common mistake—having objects slow in as they’re about to hit the ground. In sum, the relationship between forces and acceleration is axiomatic. These examples illustrate what is meant above by meaningful changes in acceleration — the spacing changes in the direction of force applied to a character or body part, and is proportional to those forces.Spacing tools for Maya
We have some useful spacing tools for CG animation. The most basic is an arc-tracker tool. This will show both the arc of the movement, and the spacing of that part of the character. The biggest weakness of arc tracking tools is that they usually track a control curve, or a joint, instead of the relevant part of a character’s geometry. However, it’s fairly close to what you need, and arc-tracking tools should be a regular part of your polishing kit. In the traditional animation days, we often tracked arcs and spacing on a separate sheet of animation paper, using various colored pencils for different body parts. Many of us who learned this trick continue to use dry erase markers right on the screen. Messy, but quick and functional—just don’t accidentally pick up a Sharpie! Maya’s Grease Pencil tool is a decent approximation if you want to keep your monitor clean. A wonderful tool that lets you see spacing in Maya the way the traditional animators did is the bhGhost tool, by Brian Hogan. This is a very powerful tool that works in both screen space and 3d space and is highly recommended.Spacing is not Timing
Sometimes people confuse timing and spacing. It’s true that if you change your timing, you will change your spacing, but they aren’t the same thing. Timing is when things happen, and how long an action takes. Spacing (along with arcs) defines how that action happens. Imagine an electric car and a regular car in a quarter-mile race. They start together and finish together. The electric car will have a smooth and rapid acceleration to it’s top speed, and then it will have even spacing. The conventional car will accelerate more slowly, and have brief decelerations each time the driver shifts gears, but it will still be accelerating at the finish line, with a higher top speed. Same timing but very different spacing.Spacing applies to your character, not the Graph Editor curves
Don’t make the mistake of “fixing” the spacing graph editor curves. It’s mostly meaningless there. When you are cleaning up your spacing, you are not grooming your curves. You need to look at your character on the screen – that’s the spacing that matters. This is especially true when working with IK controls.Spacing (like arcs) applies to every part of the body
Every part of a moving character is going to follow its own arcs, and have its own spacing. This can mean tracking a dozen different parts of the character to get it right. This idea applies to facial animation too.Fine tuning spacing comes later in the animation process
Refining your spacing requires your animation to be pretty far along. Blocking is often done with stepped tangents so we can keep the focus where it needs to be. Also, cleaning up spacing can be fussy work. You don’t want waste that time if your timing and posing are still changing. Finally, good spacing isn’t the same as super smooth spacing. Sometimes you want some grittiness in the movement, like Harryhausen’s skeletons. Perfection doesn’t happen often in real life, so don’t polish your spacing excessively. *If slow-in and slow-out is one “spacing solution” to stopping and starting, what are some others? Here are a few key solutions: 1. An abrupt stop, as when something lands on the ground and immediately settles in the final pose. Spacing goes from large to nil over one frame. 2. An abrupt stop with a bounce and settle, as when something is dropped to the ground, and then briefly bounces back in the opposite direction, before settling. 3. An abrupt stop with an overshoot and recoil, as when a character sticks a landing with their feet, but the body overshoots and snaps back (great for cartoony work and really sharp movement). Click here to learn about the other principles.


