Another blast from the past post! Originally published in 2009, this Shawn Kelly post on moving holds is still valuable as ever. Enjoy! Moving holds can be really tricky. It’s so easy to have your character moving too much, giving the performance a floaty CG feel, or to have the character freeze too much, which is instant death, especially in CG animation. You’ve worked so hard to convince your audience that your character is a living, thinking, feeling being, but no matter how much you’ve sucked them in, a frozen character instantly appears dead, and all your hard work goes down the drain as the audience remembers they’re just looking at a cartoon.
A great example of a comedic freeze that still utilizes moving holds to keep the character realistic!
1. Overshoot is your friend.
Coming to an abrupt stop is OK in animation, but in order to make it feel organic rather than robotic, you need to employ some amount, however subtle, of the idea of overshoot. Overshoot isn’t a very complicated idea. It basically works like this: Say you have a shot where a man is surprising his date with her favorite flowers. He whips them out from behind his back, and holds them out to her. As he stands there holding the flowers, you will need to do a “moving hold,” which is basically just a way to hold a key pose for a long time without looking dead. So what do you do? A) Figure out your end pose. The first thing you need to figure out is what this guy’s pose is going to be as he stands there holding the flowers out to her, and no, this isn’t something you should be trying to miraculously discover as you randomly save keys in your scene—it’s something you should have worked out in your planning stage. Is he holding the flowers proudly? Shyly? Is he embarrassed? Excited? Sad? Nervous? Is it their first date? Last date? Both? All of these things will affect his pose, and his pose should be communicating some of these ideas to us. OK, so you’ve figured out your main “holding the flowers” pose. Some people will call this your “extreme” or your “key pose.” Generally, you want this pose to be as communicative as possible, especially if it’s going to be part of a moving hold! If we’re going to be staring at this pose for a few seconds, it better be more interesting and emotive than the average run-of-the-mill pose, right? Well, now it’s time for: B) Design your overshoot pose. This pose is basically your previous “key pose,” but taken up a notch. Lift him up onto his toes a little, push the flowers a little closer to her, hunch his shoulders a bit more, widen his eyes a little extra, etc. Any and all of these ideas can contribute to the creation of the overshoot. If you take your “regular” key pose, which, in and of itself, should already have a slightly exaggerated silhouette and line of action, and then exaggerate it EVEN MORE, now you have your “overshoot pose.” C) Now all you have to do is slap that overshoot pose into your scene, maybe even just a couple frames after your “real” pose, and then arc back into your “real” key pose. You’ll need to overlap some things to pull this off properly—probably some rotation on the wrist holding the flowers, some overlap on the flowers themselves, and probably some overlap rotation in his head, but basically you’re just going from your “real” pose, to your overshoot exaggeration, and then back to your “real” pose. Arcs and timing are key here, as it will help a lot if everything doesn’t stop on the same frame, and you nearly always must have nice arcs on the wrists, head, hips, etc.2. Keep the eyes alive.
As long as the eyes are alive, you can darn near completely freeze the body and still have a chance at keeping the audience feeling like your character exists, so pay special attention to the eyes during any moving hold! Put some time into working out eye poses that really communicate his intentions, emotions, and thought process—and choose your blinks carefully and for specific reasons.See an example in this shot by Andreas Lugert. Wait for it…
3. Ease in!
Having a character slam to a complete stop is always going to look phony-baloney. There are certainly times when the style demands this sort of thing (Warner Brothers springs to mind), and if the style allows for characters to completely freeze, you can use this for great comedic or dramatic effect. However, most of us won’t be able to just have our characters freeze all the time, and when our guy pulls out his flowers, we’ll need to keep him alive, thus the moving hold. Well, in order to pull off a moving hold, you need to ease into it, at least a little bit. You have to make sure your character doesn’t feel like he just hit an invisible wall or something, which is far too common on the demo reels I see. While you will use the concept of ease-in on any moving hold, there are two basic types of moving holds, in a sense. The overshoot hold, where you zip past your destination and then quickly recover back into your intended pose, and then there’s the long ease-in pose, which is basically just a long slow subtle ease into your key pose. In either case, once you’ve arrived at your key pose, you will need to keep that sucker alive, right?! As I said, eye animation will help. Overlapping animation on the limbs will help a lot as well. However, a great trick is also:4. Ambient motion
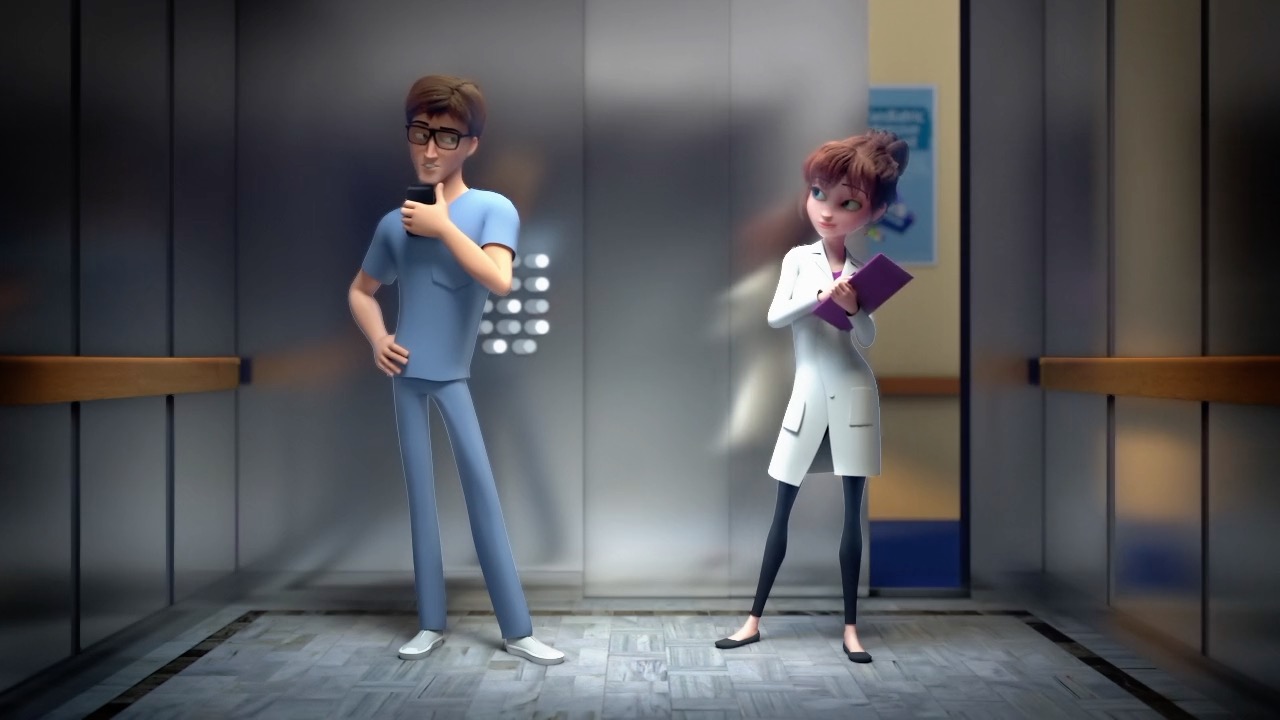
I want to stress that this isn’t “random motion,” but it is really subtle ambient movement you can put onto your characters. It can be tiny chest rotations that feel, even subconsciously, like breaths. It can be small readjustments in the head, or a slight shifting of the weight in the hips (and the chain of events that follows). It can be secondary animation, such as a sniff or fingers subtly rubbing against each other.Note the doctor on the right as well as the doctor who enters the elevator at the end. Great examples in this shot by Tony D’Aurio.